While building your machine, some wirings may come loose due to constant work. Review your wirings to see if there are loose connections.
PROBLEM #1: COIN NOT DETECTED
Solutions:
1. Check for looses wirings
While building your machine, some wirings may come loose due to constant work. Review your wirings to see if there are loose connections.
2. Make sure your power source is 12v DC
The coinslot will only work with 12V DC power source. Make sure the power source is 12V DC.
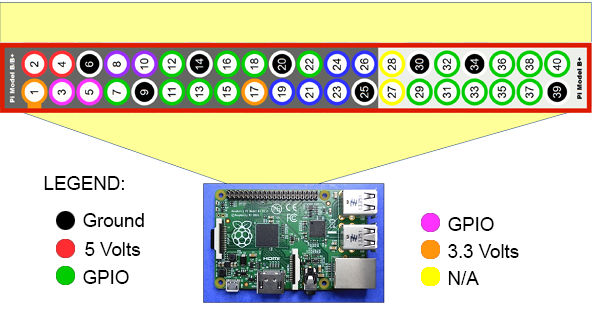
3. Check common ground
Make sure ground wire from the coinslot power source is connected to the ground pin (pin #9 or any ground pin) of the raspberry pi.
4. Change GPIO pin number
The default RPI GPIO pin (pin #3) set to detect the coins may not be working. We’ll try to use a diferrent GPIO pin in detecting the coins. To do this, login to machine’s web admin interface and go to Timer Settings.
Under Use GPIO # dropdown, select the GPIO number you want to use. This is the pin where you connect the coin (white) wire from the coinslot.
5. Restart coinslot
Try to unplug/replug the coinslot from power source.
6. Try diferrent coinslot
The coinslot may be broken and needs replacement.
PROBLEM #2: COINS ARE REJECTED
Solutions:
1. Recalibrate the coinslot
Sometimes, the coinslot was calibrated poorly that’s why it can’t recognize the coins. To fix this, follow these videos on Youtube on how to recalibrate the multi-coin acceptor.
2. Measure your power source is 12v DC
The coinslot will only work with 12V DC power source. Make sure the power source is 12V DC.
3. Remove dust with blower
Dusts can also be the cause why the sensor is not working correctly. Blow the dusts off the internal of the coinslot.
4. Try diferrent coinslot
The coinslot may be broken and needs replacement.
RPI GPIO PIN NUMBERING REFERENCE: